As our ducks and boat are to take part in a pool, we need a way to simulate water. Here, we will cover the three components that combined will create the look of our water:
The water surface acts partly as a mirror - other objects are reflected in the water surface. There are many ways to achieve reflection in computer graphics, such as screen space reflections (a pretty good article on this subject can be found on gamasutra), cube maps (these are more for static world reflections though) and planar reflections. Ray-tracing can also achieve reflections due to the way ray-tracing workings.
We will be focusing on planar reflections in this article. So what do we mean with "planar reflections"? Planar reflections works on the concept of rendering the scene from another perspective than the players camera - a camera setup behind the surface acting as a mirror. Typically, the reflection rendering pass is written to a texture that can then be drawn on the surface which acts as a mirror.
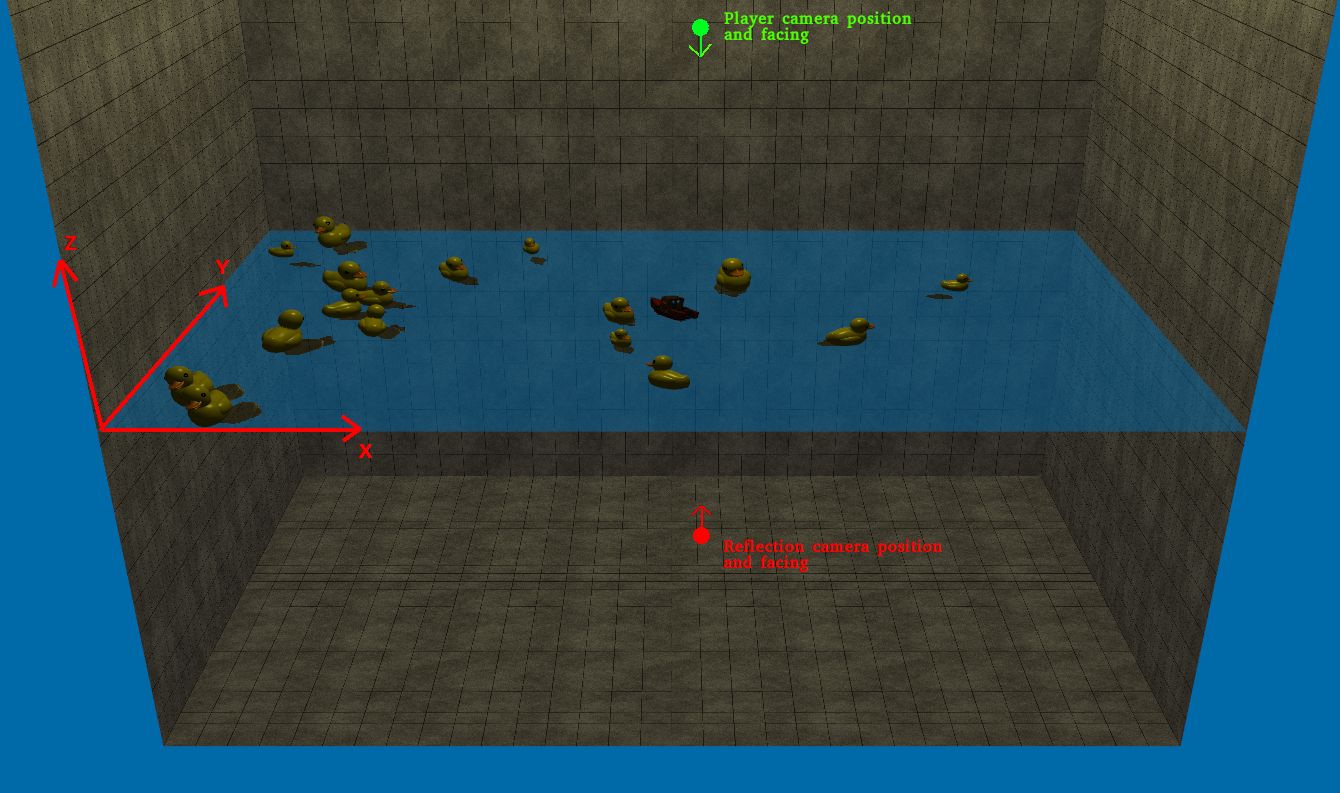
The image above illustrates the setup we have in our game - the green dot and vector represent the position and facing direction of the players camera, the red represents the position and facing direction of the camera generating the reflection. The same technique described here can of course also be applied to a mirror or any other reflective surface - it is not specific for water.
This approach has a couple of benefits and drawbacks, lets start with benefits:
Since we are using the scene to produce our reflection it will produce a very nice looking reflection. The setup is also pretty easy to grasp (all though a bit more complex to implement). Since we are not using data generated from the players camera (as when using screen space reflections) we are also free from the viewing angle - one problem with screen space reflections is that "hidden geometry" is not reflected - i.e. geometry that is not seen from the players perspective but is "seen" from the reflective surface.
Of course there are drawbacks when using planar reflections as well, lets list them:
Since we need to do a second rendering pass, the time to produce the reflected image will scale up as the scene complexity scales up. In a complex scene, this can eat away a good deal of performance. It is also a bit tricky to implement as it requires us to use frame buffers, splitting planes and multiple camera and projection matrices (one additional for the water surface in our case) to handle it. Doing deferred shading is also going to be trickier, seeing how deferred shading relies on setting up a separate framebuffer for its first rendering pass and then doing the lighting in a second pass - its possible, but it gets more complicated since we also rely on using a separate framebuffer to render our reflection output.
Now that we are aware of the pros and cons of using planar reflections, lets start thinking about what we will need in order to achieve this effect:
Rendering to a texture is a subject big enough to be its own page so I have split the section up here. It is not necessary to know the details of how rendering to textures works to understand how the reflection texture is created so you can keep on reading if you like and then readup on the details of rendering to a texture.
In our case, the reflective surface is the water. So for us, we want to place the camera underneath the water surface, right in the middle of the pool, and have it facing the water surface. The picture bellow illustrates the position of the camera (the red dot) and its facing direction

So how do we setup this "water" camera? First, lets recap one important thing about working with cameras in OpenGL. In OpenGL, the camera is stationary, facing the negative z-axis - i.e. we can not change the camera. We can, however, simulate moving a camera by moving the world around the camera. While in reality this seems cumbersome, using matrices its not hard at all. To simulate that the camera moves along the positive X axis, all we need to do is move the world along the negative X axis. This is what we will take advantage of when setting up our water camera.
Lets have a look at the code where we set this up (full source at gameScene.cpp)
const double waterZAxis = (PLAYERDEPTH * 2.0f) + REFLECTION_OFFSET;

const double worldXCenter = WORLD_XMIN + worldXLength / 2.0f;
const double worldYCenter = WORLD_YMIN + worldYLength / 2.0f;

// We cant move the camera to worldXCenter, worldYCenter - but we can move the world around
// us. That is why we negate the worldXCenter, worldYCenter values
m_viewWaterCameraReflection = glm::translate(m_viewWaterCameraReflection,
                                                glm::vec3(-worldXCenter, -worldYCenter, waterZAxis));

m_viewWaterCameraReflection = glm::scale(m_viewWaterCameraReflection, glm::vec3(1.0f, 1.0f, -1.0f));
Since we cant move the camera, we have to instead re-orientate the world around the camera. We do this by first scaling the world by (1, 1, -1), inverting the world around the z-axis and then re-position the objects so they appear at the same depth as the "original" object was.
From just reading the code, it might seem as we are translating first and then scaling - but we are actually multiplying the translation matrix created by glm::translate with the scaling matrix produced by glm::scale. This gives us m_viewWaterCameraReflection = TranslationMatrix * ScaleMatrix. This means we will first invert everything on the Z-axis and then move everything according to the translation matrix.
Since this is all a bit abstract when just put in words, I find that a picture helps explain whats going. So, as stated above, we want to first invert the world and then translate everything. Lets have a look at what happens
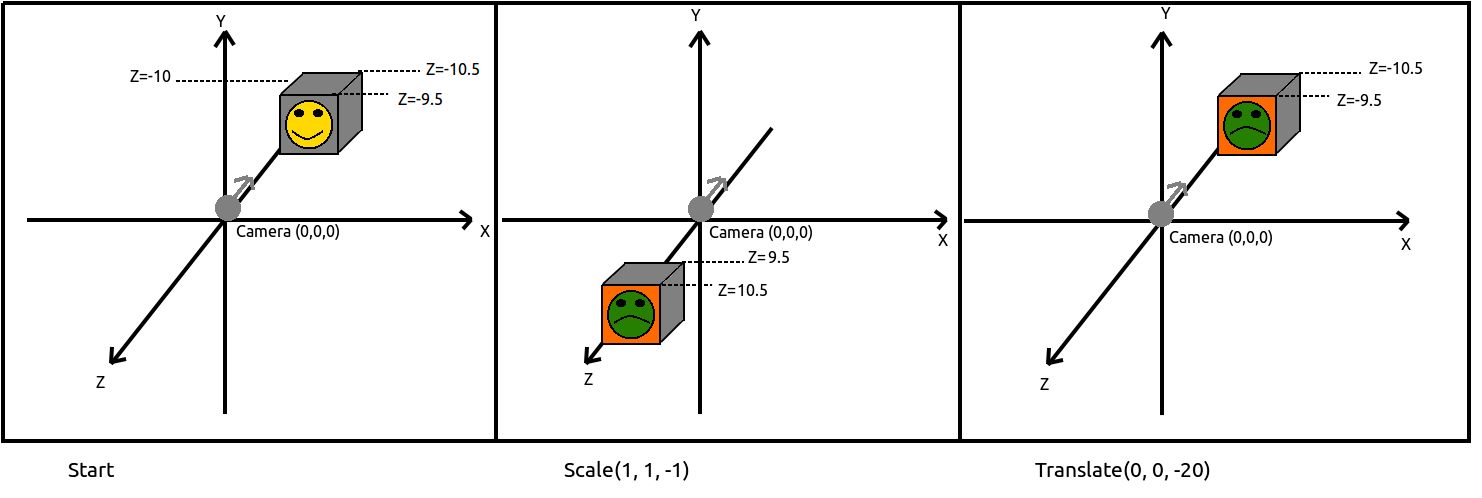
Lets assume we only have one object in our world, a 3D box at Z = -10. The 3D Box has a smiley face located at the front side, sitting at Z = -9.5 and on the back side a frowny face which is located at Z = -10.5. Our camera is, as always, stationary and located at origo facing the negative Z-axis. The first picture shows how it would look if we rendered the scene without altering the view matrix at all.
The first thing that happens is the scaling. We have specified a scaling of (1, 1, -1), so what will happen is that we will invert all Z-values. We see the results in the second picture - the whole box is now behind our camera. The interesting thing to note is that when the box moved into the positive Z-value side, the "frontside" is now the frowny face and the "backside" is the smiley face - exactly what we wanted.
Now all we need to do is move the box back to its original position. We do that by translating it 20 units along the negative Z-axis and this is what we see in the final picture. When you break the steps down into separate transformations it becomes easy to grasp what is going on.
We also need to alter the projection matrix, specifically we need to alter the aspect ratio. A common aspect ratio for rendering is 4/3. For example, the resolution 1280 x 960 has an aspect ratio of 4/3, 1280/960 = 4/3. When rendering with the player camera, we are using a 4/3 aspect ratio. This is not going to work for the water camera though, it needs to fit the size of the water surface area. So we create a projection camera as bellow
m_projectionWaterCameraReflection = glm::perspective(glm::radians(fov), float(worldXLength) / float(worldYLength),
                                                      nearZ, farZ);
When creating the reflection, we only want to see things reflected that are above the water surface. To do that, we have to setup a clipping plane. In OpenGL, this is something we have to handle both in C++ and inside the vertex shader. But first, lets figure out where our clip plane should be.
Given that any point (x,y,z) should satisfy the plane equation Ax + By + Cz = D, we can find D given a point we know is in the plane and the planes normal. The normal of the plane is known, it is (0, 0, 1) and we also know that the point (0, 0, waterlevel) is in the plane. This gives us:
Ax + By + Cz = D
0 * 0 + 0 * 0 + 1 * waterlevel = D
D = -waterlevel
We setup this plane in gameScene::PrepareForRender()
double waterLevelHeight = -PLAYERDEPTH + 1.11f;
m_clipPlane = glm::vec4(0.0f, 0.0f, 1.0f, waterLevelHeight);
The plane is a bit offset from the water level, to avoid that it clips the bottom of the player boat and ducks (this would cause us to reflect the inside of the boat/ducks, since the clip plane would cut away the bottom part and we would end up with reflections of the inner parts of the boat/ducks - not what we want).
Now lets have a look at the code that renders the water reflection and we will see how the clip planes are enabled
void WaterGfxEffect::CreateReflectionTexture(const GameScene* gameScene)
{
	glBindFramebuffer(GL_FRAMEBUFFER, m_reflectionFrameBuffer);

	glClearColor(0.0f, 0.41f, 0.66f, 0.5f);
	glClear( GL_COLOR_BUFFER_BIT | GL_DEPTH_BUFFER_BIT);

	glViewport(0, 0, s_reflectionTextureWidth, s_reflectionTextureHeight);
	glEnable(GL_CLIP_DISTANCE0);

	glDisable(GL_CULL_FACE);
	gameScene->RenderSceneWithoutHUD(gameScene->WaterViewMatrix(), gameScene->WaterProjectionMatrix(), false, false);

	// Reset - turn of clip plane, reset frame buffer to the screen and reset the viewport
	glEnable(GL_CULL_FACE);
	glDisable(GL_CLIP_DISTANCE0);
	glBindFramebuffer(GL_FRAMEBUFFER, 0);
	glViewport(0, 0, s_windowWidth, s_windowHeight);
}
The first thing we do is bind the framebuffer, clear to a light-blue, semi-transparent color, then change the viewport. Since we have now switched the framebuffer, we are actually clearing the texture we want to render to the light-blue, semi-transparent color. The viewport change is also due to the fact we are rendering to a texture, the viewport matches the size of the texture. You can read more about all of this in the "Framebuffers" section.
glEnable(GL_CLIP_DISTANCE0) is all that is needed on the C++ side, this tells OpenGL to look for a value we produce in the vertex shader (gl_ClipDistance) to determine if the face should be clipped or not
We also disable face culling, this is because the winding order of the triangles of the models might no longer be as expected since we inverted the models around the z-axis. Normally, triangles listed in a counter-clockwise order are considered to be visible (facing the viewer) - faces listed in a clockwise order are facing "away" from the viewer and can be discarded (since we wont be able to see them anyway). You can read more on this at Face-culling in OpenGL
gameScene->RenderSceneWithoutHUD(...) does exactly what it sounds as - renders everything in the scene. The first parameter we send in is the "water camera" view matrix, which will cause the scene to be rendered with the m_viewWaterCameraReflection that we went through previously. The second parameter we pass on is the "water camera" projection matrix m_projectionWaterCameraReflection, which we also went over previously. The two last booleans sent in - false, false - are instructions to leave out some elements when rendering the scene. I've choosen to not render the pool walls and the particles, because the reflection of them just dose'nt look visually appealing - to me, it just looks a bit messy so I decided to take it away.
The actual clip plane equation is sent to the vertex shader, this happens for example in the Model3d::Render function (full source at model3d.cpp)
glUniform4f(m_model3DShaderHandles.m_userClipPlane0ID, renderState.m_clipPlane.x, renderState.m_clipPlane.y,
            renderState.m_clipPlane.z, renderState.m_clipPlane.w);
We then pick the plane up inside the vertex shader:
#version 330 core

// Input vertex data
layout(location = 0) in vec3 vertexPosition_modelspace;
layout(location = 1) in vec3 vertexNormal_modelspace;
layout(location = 2) in vec2 vertexUV;

out float gl_ClipDistance[1];

out vec3 position_worldspace;
out vec3 normal_cameraspace;
out vec3 eyeDirection_cameraspace;
out vec3 lightDirection_cameraspace;
out vec2 UV;


uniform mat4 MVP; // ModelViewProjection
uniform mat4 V; // View
uniform mat4 M; // Model
uniform mat4 MV; // ModelView
uniform mat4 NM; // Normal Matrix, the transpose inverse of the ModelView matrix
uniform vec3 lightPosition_worldspace;
uniform vec4 userClipPlane0; // user defined clip plane in view-space

void main()
{
	gl_Position =  MVP * vec4(vertexPosition_modelspace,1);

	// Calculate data needed for lighing in fragment shader
	vec3 vertexPosition_cameraspace = ( MV * vec4(vertexPosition_modelspace,1)).xyz;

	// Position of the vertex in worldspace
	position_worldspace = (M * vec4(vertexPosition_modelspace,1)).xyz;

	// Need homogenus space location for the clipping
	vec4 position_worldspaceVec4 = vec4(position_worldspace.x, position_worldspace.y, position_worldspace.z, 1);

	gl_ClipDistance[0] = dot(position_worldspaceVec4, userClipPlane0);

	vec3 cameraPosition = vec3(0,0,0); // OpenGLs camera position is always fixed at 0,0,0 looking down the negativite Z axis.
	eyeDirection_cameraspace = cameraPosition - vertexPosition_cameraspace;

	vec3 lightPosition_cameraspace = ( V * vec4(lightPosition_worldspace,1)).xyz;
	lightDirection_cameraspace = lightPosition_cameraspace - vertexPosition_cameraspace;

	normal_cameraspace = mat3(NM) * vertexNormal_modelspace;

	UV = vertexUV;
}
The interesting part here is the gl_ClipDistance[0] = dot(position_worldspaceVec4, userClipPlane0). Here, we calculate the distance from the point to the clip plane. If we are spanning the clip plane, the vertex will be clipped. If the whole fragment is behind the clip plane it wont show up at all. This is described in more detail here
After we called CreateReflectionTexture, the reflection surface is now complete. While there is still water depth and refraction to deal with, that will show up in this tutorial at a later point. For now, lets just user our reflection surface to see what the results look like.
We need to create the water surface, which is a quad spanning the playable area of the game. We also need to setup the framebuffer to be able to render to the texture in CreateReflectionTexture. This happens in the constructor of the class WaterGfxEffect
const int s_reflectionTextureWidth = 1024;
const int s_reflectionTextureHeight = 1024;


WaterGfxEffect::WaterGfxEffect()
{
	// Frame buffer for rendering reflection of water
	if(!GenerateFrameBufferAndTexture(s_reflectionTextureWidth, s_reflectionTextureHeight, m_reflectionFrameBuffer, m_reflectionRenderTexture, m_reflectionDepthBuffer))
	{
		cout << "Unable to create frame buffer data for reflections" << endl;
	}

	std::vector<glm::vec2> verticesUV;
	glm::vec2 UV1(0.0f, 0.0f);
	glm::vec2 UV2(1.0f, 0.0f);
	glm::vec2 UV3(1.0f, 1.0f);
	verticesUV.push_back(UV1);
	verticesUV.push_back(UV2);
	verticesUV.push_back(UV3);

	glm::vec2 UV4(1.0f, 1.0f);
	glm::vec2 UV5(0.0f, 1.0f);
	glm::vec2 UV6(0.0f, 0.0f);
	verticesUV.push_back(UV4);
	verticesUV.push_back(UV5);
	verticesUV.push_back(UV6);

	m_waterSurface = new TexturedQuad3D(glm::vec3(WORLD_XMIN, WORLD_YMIN, WATER_LEVEL),
                                            glm::vec3(WORLD_XMAX, WORLD_YMIN, WATER_LEVEL),
                                            glm::vec3(WORLD_XMAX, WORLD_YMAX, WATER_LEVEL),
                                            glm::vec3(WORLD_XMIN, WORLD_YMAX, WATER_LEVEL),
                                            1.0f,
                                            m_reflectionRenderTexture,
                                            verticesUV,
                                            0.5f);
}
This code creates a framebuffer object and sets up two triangles spanning the pool walls. It uses TexturedQuad3D which will create a textured quad from the world coordinates, texture-coords, texture and transparency setting we send in.
From our game main-loop, all we need to call to render the scene is this
gameScene.RenderScene();
What happens is this
void GameScene::RenderScene() const
{
	RenderScene(PlayerViewMatrix(), PlayerProjectionMatrix());
}
void GameScene::RenderScene(const glm::mat4 &view, const glm::mat4 &projection) const
{
	m_waterGfxEffect.CreateReflectionTexture(this);

	// Set background color
	glClearColor(m_backgroundColor.x, m_backgroundColor.y, m_backgroundColor.z, 0.0f);
	glClear( GL_COLOR_BUFFER_BIT | GL_DEPTH_BUFFER_BIT);

	RenderSceneWithoutHUD(view, projection, true, true);

	// Render water
	const RenderStateTexturedQuad3D texturedQuad3DRenderState = {m_sceneLight, m_clipPlane, true, false};
	m_waterGfxEffect.Render(texturedQuad3DRenderState, projection, view);

	m_hudGUI->Render(m_hudOrthoMVP, view);
}
There are two RenderScene implementation - one which takes no parameters is the one we call from main. When we render the water reflection, we call the one with two parameters - the "water cameras" view and projection matrices
The water reflection is created fresh in every call - since the world has been updated, the reflection texture must also be updated. Next, we set the OpenGL background color, because when we clear the reflection texture we are using a different color (this part will probably change when I add the refraction and water depth effect in as well). Then we render the the quad that will get the water reflection texture mapped to it. There is a state sent in as well, which contains information on lights in the scene and if blending and depth test should be on - for the water surface, we want blending on so that is set to true and we want to disable writting to the depth buffer because the water surface is semi-transparent and should not overlay other non-transparent surfaces.
The video above shows reflection in action, the left side is a cutaway showing both the player (green camera) and the "water camera" (redish camera) plus their respective views on the right side. The output from the "water camera" is drawn to the water surface and can be seen in both the cutaway side and in the player camera
The game in action with the reflection can be seen in the video above
That is it for the water-surface part for now - Refraction and Water depth are coming later.