First of all - big thank you for buying and supporting this game!
This game is quite easy to mod as it dose'nt use the builtin play date formats to store textures, animations and maps. I'd be super curious to know if you created something yourself using the game - if you do, please post something on the itch store page and share your creation :)
Alright, on with the information on how to mod!
The maps as well as the tileset data needed to make maps can be downloaded here maps and tileset
The maps are created in the "Tiled Editor" (available here)
All maps must be 100 x 100 tiles big (the actual size of the tiles dosen't matter - I used 32x32 which is what the included tileset was created for).
All maps must have 2 layers and the first one must be the skybox, you need this layer even if you dont intend to have any open areas. You can leave it empty if you dont want any skybox in your map. The skybox tiles should only be either marked empty or with the 'Sky1' tile.
You should outline the borders with walls as the raycaster assumes that it will eventually find a wall. Failing to do so might result in crashes inside the game
To play the maps they have to be exported to .csv files (File->Export As). When you choose to export you will get 2 .csv file, something like "MYMAP_skybox.csv" and "MYMAP_Tile Layer 1.csv" - you need both files. The game maps are all named E1M01, E1M02... and the game expects to find a "E1M01.csv", which in this case is the "E1M01_Tiley_Layer_1.csv" file, and a "E1M01_skybox.csv" file.
The map format is really simple - each tile is turned into an integer that can either represent a wall, a sprite or the maps start and end position. The skybox is a boolean value, in the csv files its either -1 or 300, -1 means no skybox at this position and 300 means use the skybox at this position
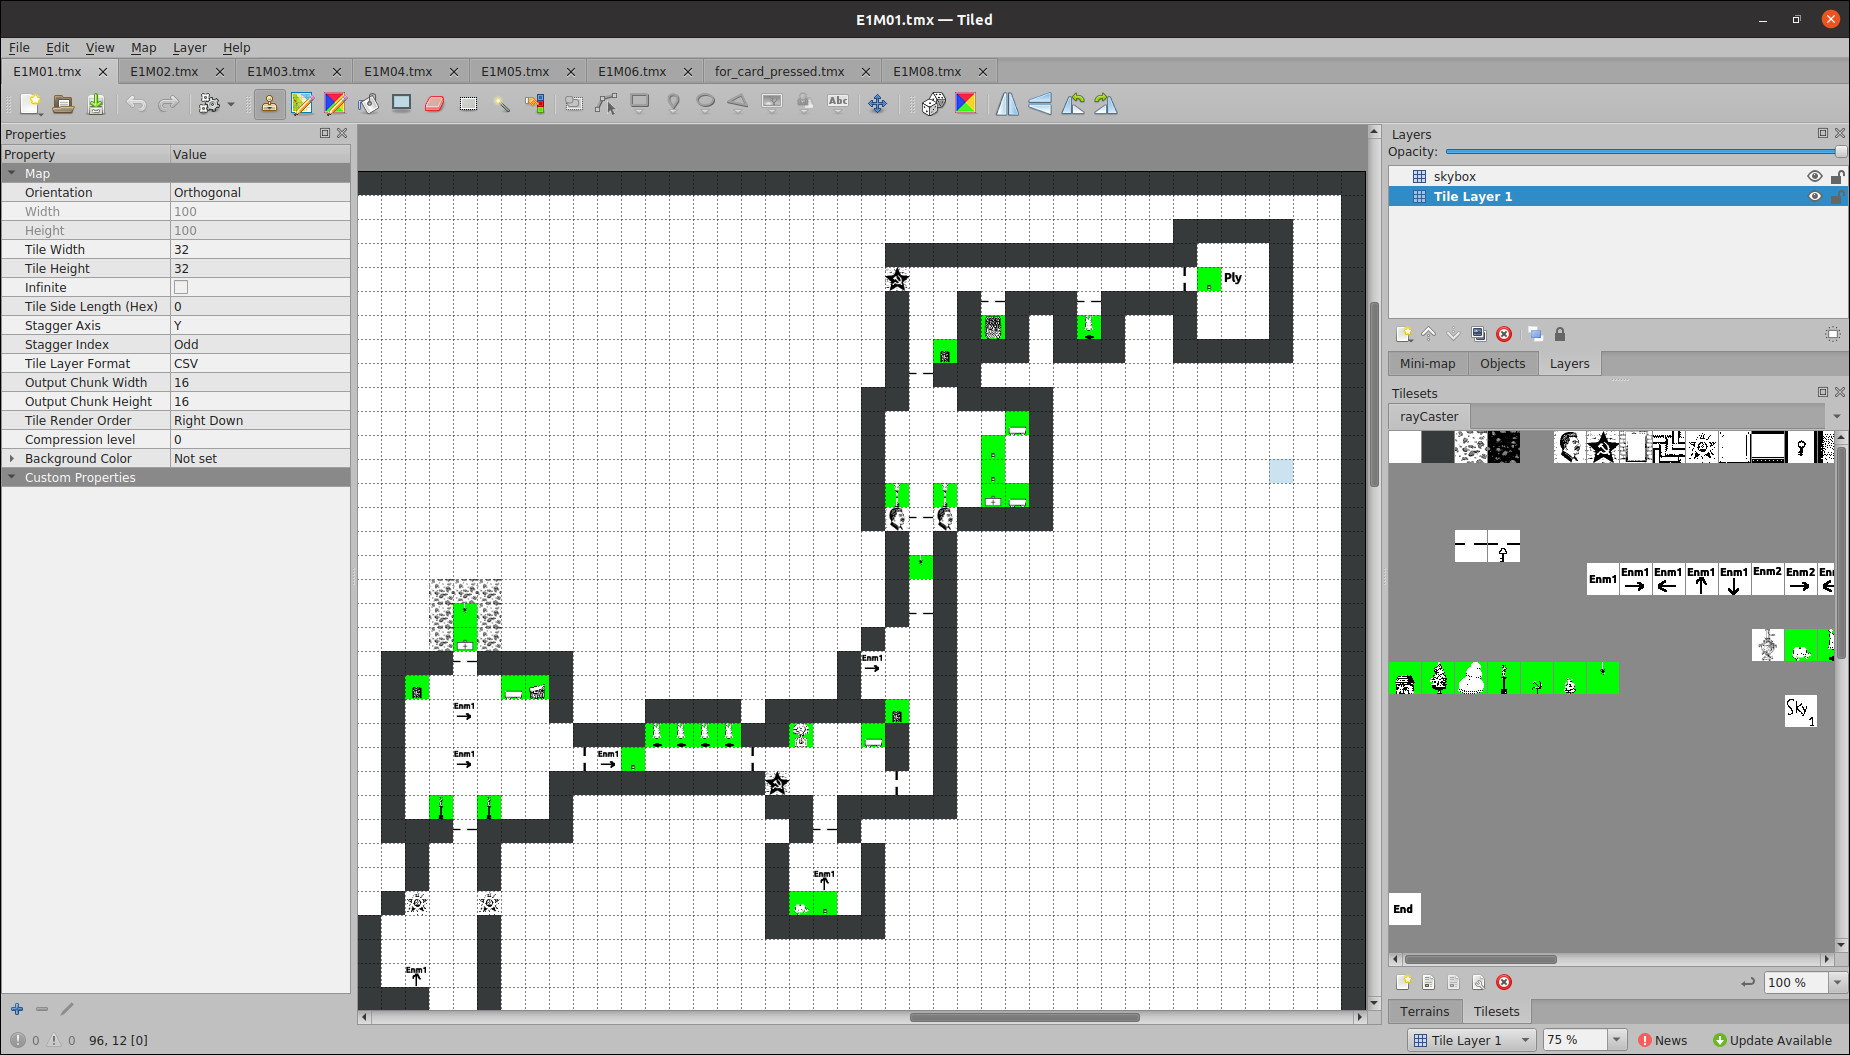
Here is an example of what the first map in the game looks like inside the editor
An important note is that the Y-axis of the maps is inverted in the game - a what looks like a left turn in the editor here of the first map will become a right turn inside the game (I might change this in a future update...)
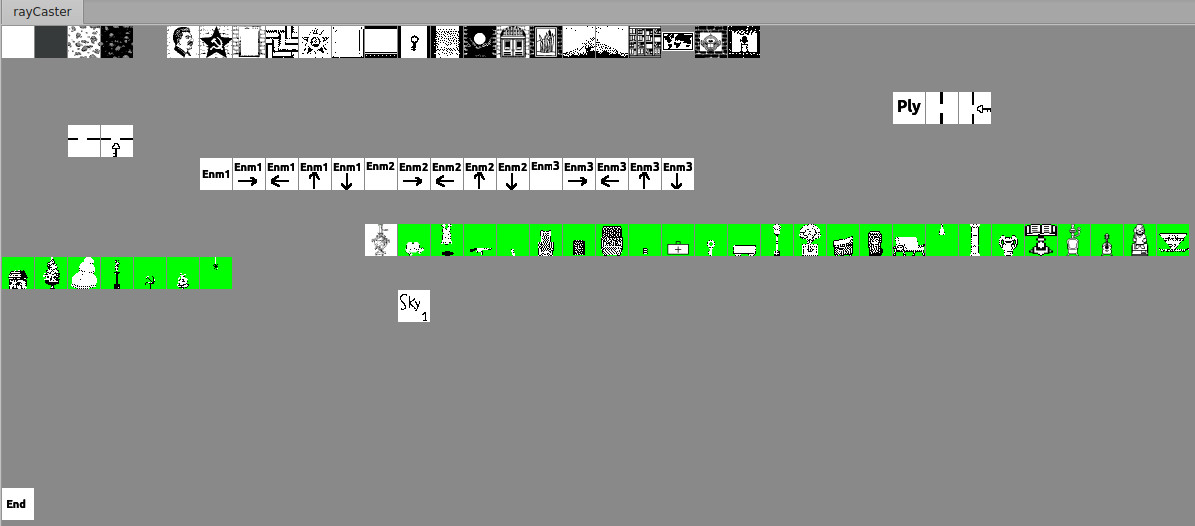
The first tile at the top row marks walkable area - this is where the player can walk freely
After that the tiles at the top row are all walls (some walls are not used in the game - wall 4 and 7. If you wanted to make custom textures, these would be prime candidates to override).
The key in the top row is for a wall with a key on it, making it visible to the player that you need a key to walk through a door
The second row has a tile "Ply" which marks where the player starts.
On the second row after the "Ply" tile is a vertical door and a vertical door that requires a key.
The third row have the horizontal door as well as the horizontal door that requires a key. The key is'nt "used up" by opening a door, so you could have multiple doors that require the player to have the key to pass through.
A fair warning when placing doors - putting doors to close together is'nt a good idea. The game can only open one door when the user presses on the B button. The door that the player is the closest to will be opened. If two doors are very close together, this might lead to the player being unable or having a hard time opening the second door depending on where he is standing
.The game has three enemies - the regular guard ("Enm1"), the machine gunner ("Enm2") and the "robot-walker" (Enm3)
The forth row is where the enemies are. "Enm1" is the regular guard standing still at the spot he is standing. The other "Enm1" with arrows are enemies that patrol - they walk back and forth in a given direction. The same concept is used for the machine gunner ("Enm2") and the "robot-walker" (Enm3).
The fifth row contains the sprites that can be placed in the game. I think they are mostly self explanatory. The "decorative" sprites usually blocks the player and enemies from walking through them - with the exception of for example the lamp hanging from the ceiling (and some others as well, try it out and see for yourself). The machinegun, health, ammo and key are items the player can pick up
The game now supports areas that use a skybox. Here is an example showing the first level that has skybox tiles. The "Sky1" tiles in the "skybox" layer will result in an open area in this section of the map.
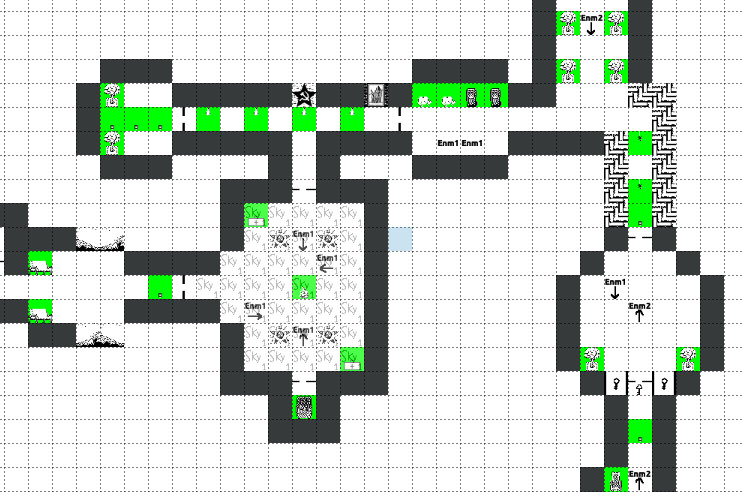
More details on skybox can be found in the "Maps" section
At the bottom there is a "End" tile. When the player walks over this tile, the game will load the next level
.Currently, the game will only load maps from the "images/maps" folder - you will simply have to override one of the maps in here (E1M01 - E1M06 and E1M08). I suggest making a backup of the original maps if you wanna play them again.
There are some limits on what you can do - you can only put 400 sprites total in a map and also a max total of 150 doors. Map 03 is pretty close to maxing out the nr of sprites (around 300 I think). I would suggest making small iterations and backing up your work if your making a map - as much as I have tried testing it out, I would'nt be shocked if there are some corner cases that can cause the game to freak out when making levels. The maps included should give a hint on how to creating your own.
The game uses 24-bit .bmp files to store textures and sprites. All of the textures of the walls are located in the "images" folder. Weapons, health, ammo and decorative sprites are found in "images/interior" (some of the decorative sprites are animated, they are in the "images/interor/animated" folder). Enemy animations are found in "images/enemies/soldier/walk". The door and door animation is stored in "images/doors"
The game uses "mipmapping" and there are 3 versions of all the wall textures and sprites (the exception is doors that only use a single resolution image). The resolutions are 128x128, 64x64 and 32x32. These are marked at the end of the name of the images - '_h', '_m' and '_l'.
An example is the wall texture nr 5 (Stalin) it has three versions - wall05_h.bmp, wall05_m.bmp and wall05_l.bmp
If you want to modify any of the graphics in the game, I would suggest you stick with the same size and width as the original ones your editing. The .bmp file format has some quirks (a width that is not dividable by 4 is padded for example - I dont support this in the code that loads the graphics. All bmp files are assumed to have a width that is evenly dividable by 4, because I just did'nt want to deal with it).
Animations and sprites support transparency - this is marked with green in the images.
When editing the bmp files it is crucial that you save them in the same format that the game can read them back. I've used "GIMP" to create all the graphics in the game and once exporting it I've used these settings
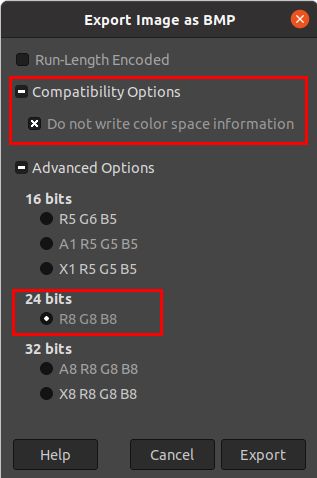
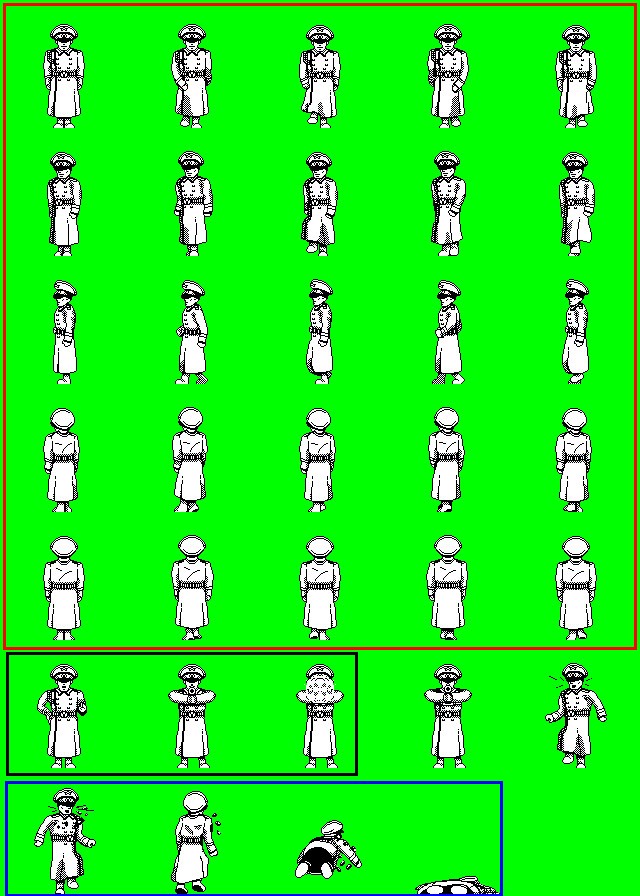
The enemies in the game uses an "image map" where the individual frames are saved. The individual frames have the same size as wall textures in the game (3 versions - 128x128, 64x64 and 32x32).
The red box marks the walking animation frames (5 angles used to create an 8 directional sprite. South west, west and north west are fliped to create the other 3 directions). The black box marks the frames used for the attack animation. The blue box marks the frames used for the death animation and the final frame of this animation is used to display a dead enemy.
If you want to create your own sprite here, I would suggest you stick with the width & height as well here. The medium resolution enemy animation has a larger width than it really needs - this is due to the quirks of the .bmp format, so dont try and change it.