
To make the game more visually appealing, we need something to happen when the player shoots at a duck. We want some sort of explosion. One way to handle that is to implement a particle system, which is what we will be doing. I recommend the Youtube video above to see the effect - particle effects really do look best in motion
Lets try to define what we want to model - what we define as a particle system - by breaking up what it consists of:
Lets start with a container for the properties of the particle
class Particle
{
    public:
    Particle();
    ~Particle();

    void CreateParticle(float *pos, float *moveDir, unsigned char *color, float size);

    union ParticleData
    {
        struct activeData
        {
            float m_pos[3];
            float m_moveDir[3];
            unsigned char m_color[4];
            float m_size;
        };

        activeData m_active;
        Particle* m_nextFree;
    };

    ParticleData m_currentState;
    float m_life;
};
We are using a union to store our particle data, ParticleData. C++ unions are not all that common, but are very efficient for some tasks and simple to understand. In C/C++, a union has members just like a struct - but in a union all of the members share the same memory region.
In our case, we can think of it as this: either m_active stores a useable value or m_nextFree stores a useable value. This is a simplification but it is useful to think of it in this way for our case. So why do we want to do this? Because our particle system uses an object pool with a free list to efficently manage free particles.
The object pool is not important in order to understand how the particle system works and for now we can just ignore it and only consider the data inside the activeData struct. This memory managment technique is, however, important for performance. We will cover it at the end of this section.
So, on to the actual data in the activeData:
Pretty obvious stuff here, the current world position of the particle, a direction which it moves in, the color (including how transparent it should be), the size and its "life". The life property is how long the particle should be visible - the amount of time until it has completly faded away. We wont be putting in a time value here, the life will instead be a value between 0.0 and 1.0. This is because we want to use the life property to set the alpha (transparency) value of the particle.
All of the individual particles of a particle system is stored in a vector.
Creating a particle system
We need a way to create our particle system, therefore we have a function CreateExplosion which will create this particular type of particle system for us. But what should the explosion look like? We want a set of particles starting at a center point x,y,z, heading out in a semingly random direction. Well, not quite. We want the shape of the explosion to look a bit like a growing sphere. If we just spat out particles in a random direction we could end up with a cone of particles going one way, or an un-symmetrical looking cloud of particles.
We will create our cloud of particles by spinning the X and Y axis around the Z axis and create particles in pairs of four. One heading in the new rotated X-axis direction and one heading in the new rotated Y-axis. Since we want a symmetrical look, we will also make two particles that head in the negative direction of the new rotated axises as well, giving us a cross-shaped pattern. By doing this in a loop and choosing a random degree of rotation for the X and Y axises, we will end up with something resembling a circle shaped pattern.
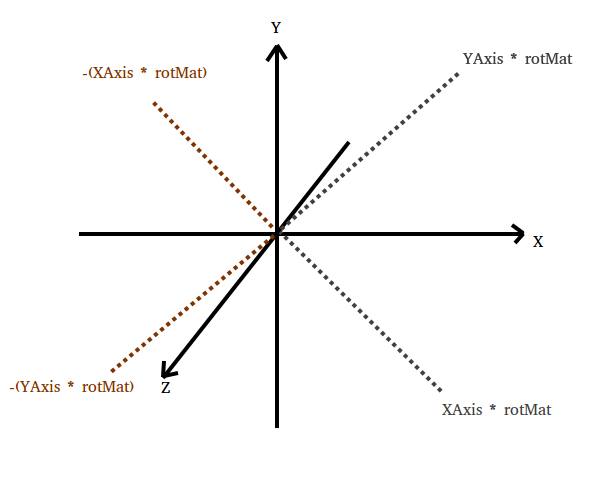
We want the particles to shoot out in their movement direction with random speed. To give the particles a more "dynamic" feel, we multiply X and Y with two separate random values - allowing the movement to deviate a bit from the cross-shape. We also want the particles to move in the positive Z axis at some random speed as well. We can see this in the code that creates the particles bellow
void ParticleSystem::CreateExplosion(int power, int nrParticles, glm::vec3 centerPos, float dieFactor, float slowDownFactor,
                                                            unsigned char *color, float size)
{
    const glm::vec4 XAxis(1.0f, 0.0f, 0.0f, 0.0f);
    const glm::vec4 YAxis(0.0f, 1.0f, 0.0f, 0.0f);

    nrParticles = nrParticles > PARTICLESYS_MAX_PARTICLES ? PARTICLESYS_MAX_PARTICLES : nrParticles;

    m_particleSpeedSlowdownFactor = slowDownFactor;
    m_particleDieFactor = dieFactor;
    m_sortParticles = false;
    float fCenterPos[3] = { centerPos.x, centerPos.y, centerPos.z };
    for(int i = 0; i < nrParticles / 4; i++)
    {
        float rotDegrees = float(rand() % 359);

        glm::mat4 rotMat = glm::mat4(1.0f);
        rotMat = glm::rotate(rotMat, glm::radians(rotDegrees), glm::vec3(0, 0, 1));

        glm::vec4 dir1 = XAxis * rotMat;
        glm::vec4 dir2 = YAxis * rotMat;

        float particleDir1[3] = { dir1.x * (1.5f + float(rand() % power) * 0.1f), dir1.y * (1.5f + float(rand() % power) * 0.1f),
                                    0.1f + float(rand() % power) * 0.1f };
        float particleDir2[3] = { dir2.x * (1.5f + float(rand() % power) * 0.1f), dir2.y * (1.5f + float(rand() % power) * 0.1f),
                                    0.1f + float(rand() % power) * 0.1f };
        float particleDir1Neg[3] = { -particleDir1[0], -particleDir1[1], -particleDir1[2] };
        float particleDir2Neg[3] = { -particleDir2[0], -particleDir2[1], -particleDir2[2] };

        Particle* newParticles[5] = {
                            m_particlePool.CreateParticle(fCenterPos, particleDir1, color, size),
                            m_particlePool.CreateParticle(fCenterPos, particleDir1Neg, color, size),
                            m_particlePool.CreateParticle(fCenterPos, particleDir2, color, size),
                            m_particlePool.CreateParticle(fCenterPos, particleDir2Neg, color, size),
                            NULL
                        };

        int j = 0;
        while(newParticles[j])
        {
            m_particles.push_back(newParticles[j]);
            j++;
        }
    }
}
Remember the object pool we were talking about in the start? That is the m_particlePool, which has a CreateParticle function. For now, we can just think of this as being equivalent to creating a new particle.
Ok, great now we have a way of generating all the particles that will make out the explosions. Now we have to figure out how we are going to render them. The natural thing that come to mind would be to simply draw all the particles in separate glDrawArrays calls, but there is a much better way - using instancing. This is achieved by sending one instance of the base "mesh" (in our case, a simple square) and then one array with positional data and another one with color data for each instance of the square.
Instancing vs "manual" instancing
Before we dive into the details of instancing, there is another approach that we could use for our particle system as well - simply creating a buffer object large enough to hold all the particles and then just update that buffer. When creating simple particles (we only have two triangles in our case), we could get even better performance from this approach. On a lot of hardware, when making a glDrawArrays call your pretty much guaranted that the graphics card will only be getting one draw call where as the glDrawArraysInstanced might end up with multiple draw calls which could give you worse performance (there is always some overhead in setting up and making additional draw calls).
It might also be better using "manual instancing" depending on how the graphics card handles scheduling - with a single draw call, the scheduler might be able to schedule many more SIMD operations than with multiple draw calls. How this works out in a real world scenario is usually hard to say before hand (unless you know exactly how the hardware works) and it is best to perform performance analysis to determine what is the best way to go. Avalanche Studios found a bottleneck in their game "Just Cause 3" like this one, it is described here (under Figure 6). Kostas Anagnostou provided me with the link to this article describing the issue, big thank you for pointing this out.
This tutorial will cover regular instancing, but this is good to know and might become very important when looking at how to squeeze out the maximum amount of performance in your game. On to the solution:
Lets start off with the base mesh
const float vertex_buffer_data[] =
{
-0.5f, -0.5f, 0.0f,
0.5f, -0.5f, 0.0f,
-0.5f, 0.5f, 0.0f,
0.5f, 0.5f, 0.0f,
};

glGenBuffers(1, &m_particleVBO);
glBindBuffer(GL_ARRAY_BUFFER, m_particleVBO);
glBufferData(GL_ARRAY_BUFFER, sizeof(vertex_buffer_data), vertex_buffer_data, GL_STATIC_DRAW);
We statically create the particles square size and upload it to m_particleVBO.
Before starting the rendering, we want to prepare OpenGL by setting some states, this happens in PrepareRender
void ParticleSystem::PrepareRender()
{
    glUseProgram(m_programID);
    glEnable(GL_BLEND);
    glBlendFunc(GL_SRC_ALPHA, GL_ONE_MINUS_SRC_ALPHA);

    glEnableVertexAttribArray(0);
    glEnableVertexAttribArray(1);
    glEnableVertexAttribArray(2);

    glVertexAttribDivisor(0, 0); // base mesh
    glVertexAttribDivisor(1, 1); // position and size
    glVertexAttribDivisor(2, 1); // color
}
The interesting part here is the calls to glVertexAttribDivisor. Here, we inform how OpenGL should fetch data from the different buffers to the shader. The first buffer object at index 0 is the base mesh - we want to go through this buffer object as normal - each call to the vertex shader should result in getting a new vertex from this buffer. On index 1 and 2 - (position and size), (color) - we want OpenGL to fetch a new one per instance call instead. That is the vertex shader will be getting index nr N 4 times before we increase N. We specify 1 as second parameter - that is the instance count. If we were making a draw call later with a base mesh of 8 vertices, the vertex shader would get index N 8 times instead.
We also enable blending, because our particles are semi-transparent.
Next, lets look at how we send the position, size and color to the vertex shader from our rendering function
void ParticleSystem::Render(glm::mat4 &projection, glm::mat4 &view)
{
    glBindBuffer(GL_ARRAY_BUFFER, m_particlesPositionAndSizeBuffer);
    glBufferData(GL_ARRAY_BUFFER, PARTICLESYS_MAX_PARTICLES * 4 * sizeof(GLfloat), NULL, GL_STREAM_DRAW);
    glBufferSubData(GL_ARRAY_BUFFER, 0, m_particles.size() * sizeof(GLfloat) * 4, &m_particlesPositionAndSizeData[0]);

    glBindBuffer(GL_ARRAY_BUFFER, m_particlesColorBuffer);
    glBufferData(GL_ARRAY_BUFFER, PARTICLESYS_MAX_PARTICLES * 4 * sizeof(GLubyte), NULL, GL_STREAM_DRAW);
    glBufferSubData(GL_ARRAY_BUFFER, 0, m_particles.size() * sizeof(GLubyte) * 4, &m_particlesColorData[0]);

    glm::mat4 viewProjection = projection * view;
    const glm::vec3 cameraRightWorldSpace(1.0f, 0.0f, 0.0f);
    const glm::vec3 cameraUpWorldSpace(0.0f, 1.0f, 0.0f);

    // Forward to shader
    glUniformMatrix4fv(m_VPID, 1, GL_FALSE, &viewProjection[0][0]);
    glUniform3f (m_CameraRight_worldspaceID,    cameraRightWorldSpace[0], cameraRightWorldSpace[2], cameraRightWorldSpace[2]);
    glUniform3f (m_CameraUp_worldspaceID,       cameraUpWorldSpace[0], cameraUpWorldSpace[1], cameraUpWorldSpace[2]);

    // 1st attrib buffer, static particle look (vertex data)
    glBindBuffer(GL_ARRAY_BUFFER, m_particleVBO);
    glVertexAttribPointer(
        0,
        3,
        GL_FLOAT,
        GL_FALSE,
        0,
        (void*)0
    );

    // 2nd attribute buffe, position of the particle + size (position is center and we expand the particle around this position)
    glBindBuffer(GL_ARRAY_BUFFER, m_particlesPositionAndSizeBuffer);
    glVertexAttribPointer(
        1,
        4,
        GL_FLOAT,
        GL_FALSE,
        0,
        (void*)0
    );

    // 3rd attribute buffer, color of the particle
    glBindBuffer(GL_ARRAY_BUFFER, m_particlesColorBuffer);
    glVertexAttribPointer(
        2,
        4,
        GL_UNSIGNED_BYTE,
        GL_TRUE,            // Normalize this, so the 0-255 value is switched to 0.0f-1.0f in the shader
        0,
        (void*)0
    );

    glDrawArraysInstanced(GL_TRIANGLE_STRIP, 0, 4, m_particles.size());
}
We start with preparing our buffer objects m_particlesPositionAndSizeBuffer and m_particlesColorBuffer, first clearing them with the call to glBufferData and then filling it with the data we have in m_particles using glBufferSubData. For our explosion example, we could have just filled them directly in the first glBufferData call - the m_particles size never change. But as we might want to build more complex particle systems than the explosion (where the size of m_partilces is updated), we do it in to two steps.
Next, we proceed to calculate the view projection matrix (model matrix is not needed, all particle positions we are sending are expected to be expressed in world space coordinates). We also provide a cameraRightWorldSpace and cameraUpWorldSpace vector - these are used to construct the particle in the vertex shader.
We are almost ready to make the render call, but first we need to specify how the data layout of our buffers look like. We bind the buffer we want to specify information about with the glBindBuffer call, then we specify the format of the data in data buffer object.
Our first buffer object, m_particleVBO stores 3 floats - simple enough to read out from the glVertexAttribPointer call
The second buffer object, m_particlesPositionAndSizeBuffer stores 4 floats - position (x,y,z) + size and they are floats
The third buffer object, m_particlesColorBuffer stores 4 chars (unsigned bytes) - this is the color information R,G,B,A. Since this value is a 0-255 value, we would like OpenGL to "normalize" it for us, making it a value between 0.0 and 1.0 - cause that is what we want in the fragment shader.
Lastly, we call glDrawArraysInstanced which will draw all of the particles in m_particles for us all in one single call.
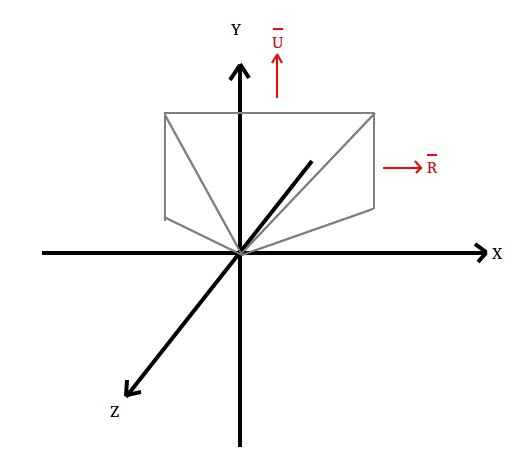
The grey pyramid represents the view frustum in this game. We know it is stationary so we can easily find cameraRightWorldSpace and cameraUpWorldSpace - they are the R and U vectors in the image above. We want these camera directions because we want to draw billboards - a 2D square that is always facing the camera straight on. By using an up and right vector facing the cameras up and right, we can easily create such a square in the vertex shader as shown bellow.
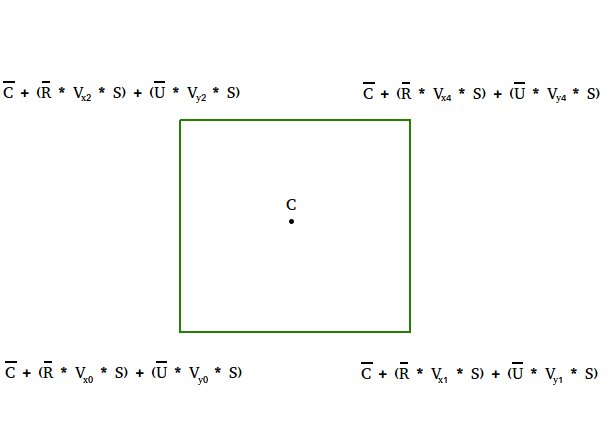
#version 330 core

layout(location = 0) in vec3 quadVerts;
layout(location = 1) in vec4 posAndSize;
layout(location = 2) in vec4 color;

out vec4 particlecolor;

uniform vec3 CameraRight_worldspace;
uniform vec3 CameraUp_worldspace;
uniform mat4 VP;

void main()
{
    float size = posAndSize.w;
    vec3 center_worldspace = posAndSize.xyz;

    vec3 vertexPos_worldspace = center_worldspace + CameraRight_worldspace * quadVerts.x * size
                                + CameraUp_worldspace * quadVerts.y * size;

    gl_Position = VP * vec4(vertexPos_worldspace, 1.0f);
    particlecolor = color;
}
Here we can see the information sent in our 3 buffers in our in-data, quadVerts, posAndSize and color. Using the posAndSize we can build the triangle around a center point, using the quadVerts and CameraRight_worldspace/CameraUp_worldspace.
Ok, lets look at the base mesh again and see how it ties in with the vertex shader:
const float vertex_buffer_data[] =
{
    -0.5f, -0.5f, 0.0f,
    0.5f, -0.5f, 0.0f,
    -0.5f, 0.5f, 0.0f,
    0.5f, 0.5f, 0.0f,
};
C = center_worldspace, which comes from m_particlesPositionAndSizeBuffer - the unique location of this particle.
R = CameraRight_worldspace, which we sent in using a uniform from the ender function.
U = CameraUp_worldspace, which we also sent in using a uniform from the ender function.
Vcn = quadVerts, which comes from the m_particleVBO. The index nr ties into the vertex_buffer_data array above and the x/y is used to orientate it according to the cameras orientation.
The fragment shader is trivial, it simply passes the color on so there is no need to cover it.
Particle system tick
This is where we update all the particles in the particle system, updating their position, their color and life. Lets dive straight into the code
void ParticleSystem::SlowParticleDown(float &v, float &slowDownFactor)
{
    if(v < 0.0f)
    {
        v += slowDownFactor;
        if(v > 0.0f)
        {
            v = 0.0f;
        }
    }
    else
    {
        v -= slowDownFactor;
        if(v < 0.0f)
        {
            v = 0.0f;
        }
    }
}

bool ParticleSystem::Tick(float deltaTime)
{
    float dieoutFactor = m_particleDieFactor * deltaTime;
    float gravityFactor = -9.8f * deltaTime;
    float particleSlowdownFactor = m_particleSpeedSlowdownFactor * deltaTime;

    bool particleSystemAlive = false;

    unsigned int particleCount = 0;
    for(auto p : m_particles)
    {
        if(p->m_life > 0.0f)
        {
            // Decrease life
            p->m_life -= dieoutFactor;
            if (p->m_life > 0.0f)
            {
                particleSystemAlive = true;
                float alphaColor = (p->m_life / 1.0f) * 255.0;
                unsigned uAlphaColor = static_cast<unsigned int>(alphaColor);
                p->m_currentState.m_active.m_color[3] = static_cast<unsigned char>(uAlphaColor);

                // Speed should slowly decrease
                SlowParticleDown(p->m_currentState.m_active.m_moveDir[0], particleSlowdownFactor);
                SlowParticleDown(p->m_currentState.m_active.m_moveDir[1], particleSlowdownFactor);

                // Apply a pull downwards to simulate gravity
                p->m_currentState.m_active.m_moveDir[2] += gravityFactor;

                p->m_currentState.m_active.m_pos[0] += p->m_currentState.m_active.m_moveDir[0] * deltaTime;
                p->m_currentState.m_active.m_pos[1] += p->m_currentState.m_active.m_moveDir[1] * deltaTime;
                p->m_currentState.m_active.m_pos[2] += p->m_currentState.m_active.m_moveDir[2] * deltaTime;

                m_particlesPositionAndSizeData[4 * particleCount + 0] = p->m_currentState.m_active.m_pos[0];
                m_particlesPositionAndSizeData[4 * particleCount + 1] = p->m_currentState.m_active.m_pos[1];
                m_particlesPositionAndSizeData[4 * particleCount + 2] = p->m_currentState.m_active.m_pos[2];
                m_particlesPositionAndSizeData[4 * particleCount + 3] = p->m_currentState.m_active.m_size;

                m_particlesColorData[4 * particleCount + 0] = p->m_currentState.m_active.m_color[0];
                m_particlesColorData[4 * particleCount + 1] = p->m_currentState.m_active.m_color[1];
                m_particlesColorData[4 * particleCount + 2] = p->m_currentState.m_active.m_color[2];
                m_particlesColorData[4 * particleCount + 3] = p->m_currentState.m_active.m_color[3];
            }
            particleCount++;
        }
        else
        {
            m_particlePool.ReturnParticleToFreePool(p);
        }
    }

    /*
        Since we sort our particles after we updated them, but put their data into the
        m_particlesPositionAndSizeData & m_particlesColorData before, some particles will not be correctly sorted.
        This should not effect the visual result that much, so this was made like this to make the solution a bit
        less complex and faster. If it produces graphical artifacts - make the sort before putting the data into
        m_particlesPositionAndSizeData & m_particlesColorData.
    */
    if(m_sortParticles)
    {
        std::sort(m_particles.begin(), m_particles.end(), [](Particle* p1, Particle* p2)
                    {return p1->m_currentState.m_active.m_pos[2] > p2->m_currentState.m_active.m_pos[2];}
                    );
    }
    return particleSystemAlive;
}
The first thing we do is use our deltaTime - this is to make sure that everything is time-based. After that, we simply iterate through all the particles, slowing their movement speed down, apply the gravity, move them along their movement vectors and finally place them in our m_particlesPositionAndSizeData & m_particlesColorData vectors so we can upload the refreshed data later in the render.
Here we notice our object pool again - when a particle expires, we want to return it to the pool. We will discuss this in more detail later on.
At the very end is a heavy operation of sorting the particles with respect to which one is closest to the camera. The reason we would want to do this is because when drawing overlapping triangles that have transparency - they need to be drawn from back to front. The picture bellow illustrates the problem.
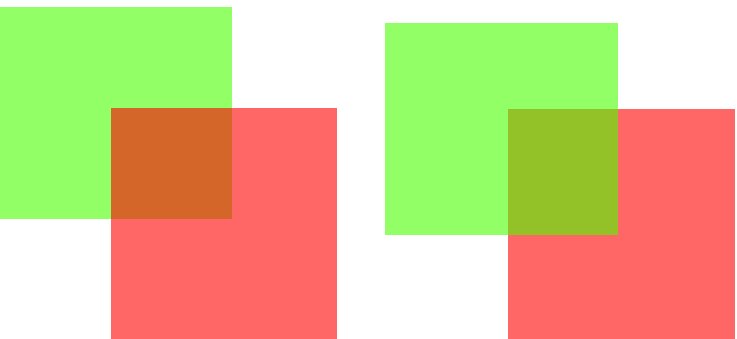
The left image shows what happens if the red square is drawn first, the right one if the green triangle is drawn first. The result of the blended color, where these square overlap will get different results if you drawn them in different order. The correct way is to draw them back-to-front. This requires you to sort the triangles in depth order though, which can be quite expensive.
The Tick function returns a bool - particleSystemAlive, which indicates if there are any active particles in the system left. That information is caught in ParticleSystem::TickParticleSystems which will delete this particular particle system if it no longer has any active particles.
Object pool
An object pool is a memory managment technique, usually applied when one wants to take control over dynamic allocation of some objects from the standard memory allocation provided by the language (new/delete in C++ for example). The object pool usually consist of a choosen fixed size, X nr of objects.
There are two key benefits to using an object pool:
Memory fragmentation
Since our game data is of varying size, allocating and de-allocating memory from the heap will fragment it - leaving differently sized free memory blocks locked between occupied ones. If your making a large game that will need a lot of memory, you might run into problems if you dont try to avoid this fragmentation. This can be especially true on hardware with more scarce memory than a PC, for example a game console or a mobile device. Lets look at an example of the problem
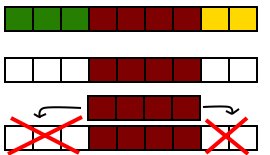
The first stripe in the image represents three different game objects allocated in memory (green, brown and yellow). The next stripe illustrates the same memory block after we free up green and yellow. As we can see here, the memory is now fragmented - we got 5 blocks of free memory but they are fragmented into two blocks of size 3 and 2.
If we wanted to allocate another brown block (as shown in last section of the image), we can not fit it in memory even though the brown block is only 4 blocks big and we got 5 blocks of free memory. This is the kind of situations we want to avoid.
An object pool provides us with a solution - X number of equally sized blocks for X nr of objects. Since we allocate a memory section big enough to hold X number of objects and dont return it until we are done with our pool, we will never fragment the memory no matter how many times we create and destroy objects in the pool.
Performance
Depending on the implementation of malloc/free, your game may suffer in varying degrees from making many calls to them (C dynamic memory allocation). One of the benefits of the object pool is that you can (usually) do better by using an object pool. Both allocating and freeing boils down to O(1) at no extra memory cost if we utilize a free list.
Implementation
This all sounds great, so lets dive in to how we would go about implementing one.
class ParticlePool
{
    public:
    static ParticlePool& GetInstance();

    ~ParticlePool();

    Particle*   CreateParticle(float *pos, float *moveDir, unsigned char *color, float size);
    void        ReturnParticleToFreePool(Particle* p);

    private:

    ParticlePool();

    Particle* m_firstFree;

    std::vector<Particle> m_particles;
};
The particle pool behaves very much like new/delete - we can dynamically get a new particle using CreateParticle and then return it with ReturnParticleToFreePool. Internally, we have a big block of particles in the m_particles vector.
The particle pool is designed to be a singleton - we only want one particle pool for all particles. Once a particle system is created, it will grab a reference to the particle pool and use it to get all the particles it needs.
Lets have a look at what the particle pool actually does, starting with initialization:
ParticleSystem::ParticlePool::ParticlePool()
{
    // Create one big continuous memory section
    for(int i = 0; i < MAX_PARTICLES_TOTAL; i++)
    {
        m_particles.push_back(Particle());
    }

    // Initially, all particles are free so lets link them all together
    for(int i = 0; i < MAX_PARTICLES_TOTAL - 1; i++)
    {
        m_particles[i].m_currentState.m_nextFree =  &m_particles[i + 1];
    }
    m_particles[MAX_PARTICLES_TOTAL - 1].m_currentState.m_nextFree = NULL;

    m_firstFree = &m_particles[0];
}
The first thing we do is to grab the memory we want by filling up m_particles with particle instances.
Initally, we got no active particles. They are all free. In order for us to be able to quickly tell which particle is free, we want to setup something called a free list. A free list is just a linked list, in this case of all the objects that are free. The reason we want them linked together like this will become apparent when we look at the CreateParticle and ReturnParticleToFreePool.
Remember the union (union ParticleData) from the beginning? This is where having the union pays off. The particle can be in two states: Alive or dead. When it is dead, it is free to be used and part of the free list. When it is active, it is not part of the free list. The fact that these two states are mutually exclusive is what we take advantage of with our union - either we are free and using the m_nextFree pointer to be part of the free list, or we are active and the m_active holds our current state.
Last, we want a pointer to the fist free particle which we store away in m_firstFree.
Ok, lets have a look at how we can allocate a particle from the pool:
ParticleSystem::Particle* ParticleSystem::ParticlePool::CreateParticle(float *pos, float *moveDir, unsigned char *color, float size)
{
    Particle* particle = NULL;
    if(m_firstFree)
    {
        particle = m_firstFree;
        m_firstFree = m_firstFree->m_currentState.m_nextFree;
    }

    if(particle)
    {
        particle->CreateParticle(pos, moveDir, color, size);
    }

    return particle;
}
When we need a particle from the pool, we grab the one at m_firstFree. Then we use the free list to find the next free particle and set m_firstFree to point to that one. This is how we can get away with O(1) performance - we simply need to update m_firstFree. If there was a particle available, we init it with the data sent.
Finally, lets look at what we do when we want to return a particle to the pool:
void ParticleSystem::ParticlePool::ReturnParticleToFreePool(Particle* p)
{
    p->m_currentState.m_nextFree = m_firstFree;
    m_firstFree = p;
}
Simple, we just need to push the particle p to the begining of the free list. We link the first free particle m_firstFree to be next after p, then we simply point m_firstFree to p.
That is pretty much it for the particle system, which means we have cleared the rendering part of the game. Lets move on to the next subject - Collision Managment
Back to main page Previous section - Rendering Next section - Rendering water surface